 |
||||||||||||
| 10 Reasons Big Question Rider Profiles Owner's Manual HOME |
Why the DC Model? DC Model Videos |
Images Video Events |
Links Velo News The Other Brands Mike's Rants |
|||||||||
Velo News Articles
> HOW TO RIDE YOUR BIKE FASTER MERELY BY READING A MAGAZINE ARTICLE
> ONE FINGER ONLY
> DO YOU KNOW WHERE YOUR REAR AXLE IS?
This article was written in 2000 to introduce a series of articles to be featured in Velo News Magazine.
HOW TO RIDE YOUR BIKE FASTER
MERELY BY READING A MAGAZINE ARTICLE
I would like to talk about the five types of athletes. I first discovered this classification system playing volleyball in college with anyone and everyone who happened into the gym. Like all great truths, it applies throughout the universe, to every sport, including cycling. Athletes always fall into one of these five types: The Socialite, The Score Keeper, The Adrenaline Junky, The Body Nazi, and the Skill Geek.
The Socialite is the RAGBRAI rider who lives for the ice cream stop. This type is in it for the society, the friends, and the food. The Score Keeper doesn't care who they are with or what kind of bike they are on, as long as they get to win. This is the sandbagging Cat 2 who isn't embarrassed about winning the beginner class. The Adrenaline Junky is of course, the downhill/chair lift thrill seeker or the bmx rider who doesn't do races, just jumps. Body Nazis are the heart rate monitor, stationary trainer types. If it doesn't hurt then whats the point? Endorphin addicts, never satisfied with a mere four hour ride, they want to go out for a run. And finally the Skill Geeks are the trials riders who only care about keeping their feet on the pedals. The idea isn't to get somewhere, or to get fit, or even to make your wheels roll, but to keep your shoes clean.
Each of these types has its good and bad sides. The Socialite who talks too much and wants to stop at every fruit stand, may be the only one considerate enough to have brought along the spare derailleur you need. The Body Nazi who won't ever stop to talk, just may be the one to push you up the last hill when you thought you would never make it. The Skill Geek who embarrasses everyone by riding on a picnic table, might show you how to get over that big log that was always so frustrating.
No
one is completely just one type, we are all a mixture of the five. In
fact, the more even the mix, the more well adjusted the cyclist. The
same mountain biker could love the downhills, and try their hardest to
beat their best friend, while wearing a heart rate monitor. They may
have the skill to ride over a mini van, the push it takes to race for
24 hours in the mud, a resting heart rate of 32, and be loved by one
and all. This person could be very balanced and healthy. This is not me.
I am a Skill Geek, a trials rider, and my bias knows no limits. And I
don't think I'm alone on this one. Most bikers I know, prefer riding on
trails that are much more technical than the average mountain bike race
course. These people are more interested in tight narrow singletrack
than they are in the smooth dirt roads of Vail's race course.
So that's who I am, and I'm going to be writing a series of articles here about bike handling skills. Of course, the concept of reading how to ride may seem strange. I have always considered the "skills article" to be an oxymoron. This comes from my membership as a teenager in a decidedly non-verbal motorcycle trials club. People who stood around "talking about riding" either had broken their motorcycle, run out of gas, or were hiding the fact that they couldn't ride worth a damn. The Michigan state champion back in the early 70's was Bob Hopkins. I have spent many hours following him around, watching his every move, but I don't think I ever heard him speak.
I have since changed my mind and now think of mountain biking skills as quite "coachable". I no longer consider "talking about riding" to be a sign of inexperience. But it is important to keep this idea of "coaching" in perspective. Sports of all kinds can be placed along a continuum, going from almost pure fitness like running on a treadmill, to almost pure skill, like golf or diving. Each sport has a fitness and a skill component. Within cycling there is a continuum ranging from a flat time-trial to observed trials. Obviously there is skill involved in a time-trial and fitness involved in observed trials, but you get the idea. Skill and fitness both come from riding yet both can be enhanced through coaching. I would argue however, that in general, fitness comes from grinding out the miles, and coaching isn't going to help much. Skills, on the other hand, can be acquired simply from careful observation. Watching Joe Murray win a mountain bike race can make me smoother but it doesn't make me more fit. The first time I saw Kevin Norton negotiate a four foot drop-off, rear wheel first, I learned how to do it. The right combination of experienced coach and willing student can, in 15 minutes time, radically and permanently improve the student's skill. Fitness isn't like that. Fitness allows no shortcuts, but skills, as I hope to demonstrate, can be enhanced merely by reading a magazine article.
This series is not about nutrition, tactics, training regiments, or cleaning chains. These articles are only concerned with getting down the trail as smoothly and gracefully as possible. Of course I will try to show how trials skills inevitably result in greater speed and conservation of energy. I make no apologies for sometimes riding slower than I could run with the bike. After all, I'm a Skill Geek and I wouldn't want to get my shoes dirty.
 This
article was first published in Dirt Rag Magazine issue # 41 November
1994. It was also printed in Velo News that year. It is very
interesting now to see how this idea has completely caught on. It is
the "I told you so" that I can't resist. For me, the origins of this
idea goes back to motorcycle trials and Bernie Schriber. He is the
first person I saw to use the (now completely universal) one finger
clutch. The left hand operates the clutch on a motorcycle. They changed
the motorcycle set up to allow the clutch to be pulled in more easily,
so easily that it could be done with just one finger. This transformed
motorcycle trials. Riders could now pull the clutch in, scream the
engine rpms, and release the clutch suddenly to gain a huge forward
lunge. The motorcycle drives forward so suddenly and violently that
just hanging on to the bars with ones pinky and ring fingers wasn't
strong enough.
This
article was first published in Dirt Rag Magazine issue # 41 November
1994. It was also printed in Velo News that year. It is very
interesting now to see how this idea has completely caught on. It is
the "I told you so" that I can't resist. For me, the origins of this
idea goes back to motorcycle trials and Bernie Schriber. He is the
first person I saw to use the (now completely universal) one finger
clutch. The left hand operates the clutch on a motorcycle. They changed
the motorcycle set up to allow the clutch to be pulled in more easily,
so easily that it could be done with just one finger. This transformed
motorcycle trials. Riders could now pull the clutch in, scream the
engine rpms, and release the clutch suddenly to gain a huge forward
lunge. The motorcycle drives forward so suddenly and violently that
just hanging on to the bars with ones pinky and ring fingers wasn't
strong enough.
Much of the reason why everyone now does their braking this way has to do with the improved quality of the brakes. The BIKE SET UP part below is no longer needed. Our new disc brakes are that good.
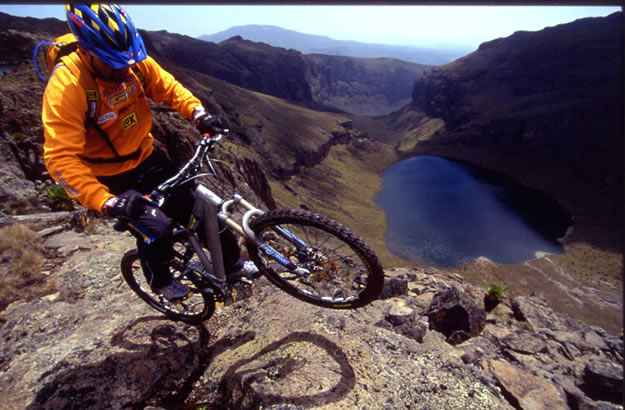
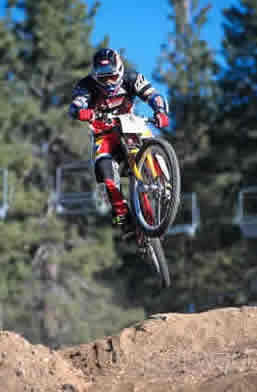
People who have ridden with me or been to one of my trials clinics know there is one riding "tip" that is my all time favorite. John Tomac and Hans Rey have been photographed doing it hundreds of times. 99% of all trials riders do it (motorcycle and bicycle). The tip is simple to describe. Use only your index finger on the brakes. Not two, not three fingers, just the one. With the previously mentioned skilled riders as my evidence, I would propose that it isn't just a matter of personal preference. I suggest that the way John Tomac and Hans Rey do it is the best and you should copy them. Look closely at photos of mountain bikers riding. The more "skilled" their style of riding (ie. trials or downhill), the more likely it is that they will use one finger, not two.
 GRIP STRENGTH
There are countless photos of Tomac flying through the air. I wonder how many people noticed his index fingers resting on the brakes levers. Why would he do that? You can't brake in the air. Wouldn't he prefer a full grip on the bars for jumping? Four fingers are stronger than three which are stronger than two. People who use two fingers on the brakes do their downhills with only their small and ring fingers gripping the bars. For the most difficult terrain, one needs to hang on hard, and use the brakes at the same time. One expert rider I questioned, "Why just your index finger"? answered, "Because I need these three to hang on with."
REACTION TIME
When the flying Tomac returns to the ground, he will want brakes. If he is landing in a bad spot, he may want brakes the instant he touches down. It takes time to unwrap your fingers from the grips and get them to the brake levers. Especially if you are out of the saddle, (or in the air) the 1/10th of a second it takes to switch your finger position can be very critical. Anyone who has ridden in bad city traffic knows how much more relaxing it is to go through an intersection with a finger poised ready for any emergency. You need both things at once, a powerful grip on the bars, and the instant reaction time that comes from always having a finger on the brakes. Thus: Use only one finger on the brakes.
 BIKE SET UP
People rarely copy expert racers who ride with just one finger on the brakes. They try it, aren't used to squeezing hard with just one finger, don't get as much braking force as they are used to and conclude that they aren't strong enough. To truly experience how much better one finger braking can be, you will probably need to improve your brakes. Some combinations of brake levers and shifters don't work very well. Assuming everything sinew and set up perfectly, the first adjustment is to get your finger out on the end of the lever. Leverage is your friend. I usually use the old fashioned "four finger" levers positioned in towards the stem. The bulge in Bulge bars is often a problem. This one article can't possibly cover all the "hopped up" braking systems there are. Sand papered rims, tar on the rims, long levers grafted onto short bodies, and pulley wheels to double the power, were all invented by trials riders who shudder at the thought of using two fingers on the brakes. For mountain bike racing you don't want the hair trigger brakes of a trials bike but too much power is better than needing to switch to two fingers
IT WORKS
This is not just for trials riders. Everyone feels better hanging on with three fingers instead of two. Everyone appreciates having their reaction time reduced to zero. You can apply and release the brakes at any time, on any rough downhill, instantly. You can now slightly drag the brakes around a tight turn but still pull hard. Maybe the clearest example of how "it works" is a steep downhill (on the brakes hard) with a log crossing. You need a momentary release of the brakes and a good grip to lift over, but the downhill continues after the log. At the world's in Vail this year I was watching the trials with former national champ Jim Rososco. An Italian trials rider was there who used two fingers. I was stunned. I asked Jim, "Can you ride with two fingers like that?". "Not at all" he said. "I don't see how he can do it." Move your middle finger from the brake lever to the hand grip. Trust Tomac, you will ride faster, smoother, with more confidence, and more control.
Parenthetical note on modulation. People get on one of my bikes with good brakes meant to be operated with one finger and diagnose a lack of modulation. My bikes have excellent modulation, it just all happens with very little pressure at the lever.
This article is from the June 16 1997 issue of Velo News Magazine.
DO YOU KNOW WHERE YOUR REAR AXLE IS?
Getting the front wheel up and over a small obstacle comes naturally to most people. No one simply rams straight into a curb with the front wheel. You lean back to lighten the front wheel, which conveniently weights the rear wheel, tug on the bars, pedal hard, and the front wheel is easily over. But then what do you do with the rear wheel?
What most people do was demonstrated by a very classy looking mountain biker I saw out my shop window the other day. He had to cross the road and go up an eight-inch curb to get into the woods. He lifted his front wheel perfectly. It was beautiful to watch. The front wheel rose into the air at just the right time and set down gently on top of the rub. Then he knew enough to get up off this saddle so the rear wheel wouldn't hit so hard. But he made no attempt to lift the rear wheel. It didn't hit hard, but the perfect lift he demonstrated with the front wheel wasn't there for the rear.
Awareness of the rear tire's position is an important measure of off-road riding skill. One extreme of such awareness can be seen at any trials event. A good trials rider can negotiate an entire section on just the rear wheel. It's remarkable to see a rider balanced on one wheel, hop forward, and place the rear tire perfectly on top of a basketball-sized rock. The other extreme isn't so nice to see. Rear-wheel blindness was once demonstrated by my friend Dave, who, unfortunately, was riding my new road bike. The traffic across Somerville Avenue was so bad that a we were running with the bikes. On the opposite side of the street was a great big, sharp granite curb. Dave, while running full speed beside the bike, lifted the front wheel up and then just let the rear wheel slam into the curb. Even with 100 pounds of air pressure in the tire, the result as a four-hole snake bite and dented rim.
All right, how do I become aware?
How do you learn to get the back wheel up the curb as elegantly as the front? What you may need isn't so much the mechanics of how to lift the rear wheel ("Single Track Mind" JUne 17, 1996), but simple timing. Since you can't really see the rear wheel, the timing is hard. The tendency is to wait too long to lift. We use the feel of the rear tire hitting the curb to know where the wheel is. But that's too late. The hard part is that you have to lift before the wheel touches. But watch out. I'm sure many of you are familiar with the consequences of lifting too soon. It's all to easy to come down early and ram the rear tire right onto the sharp edge of the curb. After a few of those rim-smashing pinch flats, it's tempting to be extra cautious and wait to feel the tire touch before lifting. Since you can't really see the rear tire, knowing when to lift it is a mysterious, blind sort of thing. But there are ways of developing a sense for where it is, without risking another snake bite.
For the first step, try looking at the rear tire. It's kind of awkward, especially while riding up a curb, but try it a few times. Come at a curb as slow as you can. As soon as the front wheel is up, move your leg out of the way, lean off the side of the bike, and look down to watch the rear tire make contact. Don't try to ride up the curb, just watch the rear tire hit, get off the bike and try again.
Next, use the brakes and stop just before the rear tire touches. Hold the brakes on, put your feet down and look at the rear tire. Notice how close to the curb it is. Notice where the bottom bracket is relative to the curb. Look for any visual clues to help with your timing. Remember too, that the timing varies wildly depending on your speed. I suggest you start out by going as slow as you can. A second step is to get someone to watch you and tell you where the rear tire is. In fact, asking someone to observe and coach is a highly underrated training tool. An assistant can help you improve your timing by yelling "Now!" when the rear tire is about a foot away as you ride up the curb. If you're having trouble with the timing, and you repeat this over and over again, it will help. If you need to bribe someone to come out and work with you, tell your assistant that he or she can make an obnoxious honking sound if the tire touches the curb due to late timing. This can do wonders for motivation. However, in order to protect your ego, make a rule that if you jump too early, and get a snake bite flat, your assistant should try very hard not to make the honking sound.
I find the help of an assistant to be very useful. I was having trouble getting up a ledge. It was high enough that the rear-wheel jump had to happen even before the front tire touched. I kept doing it wrong over and over. I couldn't jump early enough until I got my friend to yell "Now!" at precisely the right moment. I"m not alone in asking for such help: Professional motorcycle trials riders often rely on a coach to help them through difficult sections.
One last thing you can do to help gain rear-wheel awareness is play "mountain tennis". This game was invented quite by accident the day after Dave wrecked my road wheel. We were riding across a big empty parking lot (he was on his own bike this time), and we found a tennis ball. We started kicking it to each other across the parking lot while riding. Then we made a rule that you weren't allowed to use your feet. The goal was to keep the ball rolling by bumping it with your tires. A tennis ball is just big enough to mess you up if your tire rolls over it, but not big enough to cause injury. If you decide to try mountain tennis, start out by simply riding all around the ball without touching it. Make your front wheel go to the left and the rear wheel to the right. Look down as you do this. Everyone knows how the rear tire tracks well inside of the front in a tight turn. Hopefully the tennis ball will emphasize this point for you. Next, roll past the ball slowly and try to bat it with your front wheel. The back wheel can deliver a much stronger bat but is harder to use. The true mountain tennis champion can roll briskly past the ball and jump the rear tire to the side at just the right instant to knock the ball clear across the parking lot. The non-competitive form of this game is where everyone works together to keep the tennis ball rolling. The competitive form is to mark off two goals and form two teams. We haven't had much luck with this form. You'll have to ask the bicycle polo people how they keep from smashing into each other.
If you play a couple of heated matches of mountain tennis, you may notice a new skill on your next trail ride. When a slippery root makes your rear wheel skip left, just think of hitting the tennis ball to the right. You'll find that mountain tennis, combined with watching your rear wheel or having someone observer your curb hopping, can bring a whole new perspective to the sport - so that you always know where your rear wheel is.